So, you want to build a trash collecting RC boat?
4-20-2020
It can be less challenging then you think! We wanted to make building a trash collecting robot easy, so we made this one as simple as possible. With a trip to the hardware store and some rc components you can build your own. Then, if you want to make it controlled over the internet hook it up to RC Everywhere by following the next tutorial.
Componenets
You can find an itemized list of parts used HERE!
- Motors You want your bot to go somewhere we assume, so you're going to need some sort of propulsion. There are a few options for motors for different situations. Three wire RC boat motors and two wire electric trolling motors are the two most common. In this tutorial we are using T200 Thrusters from Blue Robotics! We also like Water Snake electric trolling motors for their lightweight contruction and power.
- Motor Controllers You need to control your motors, so you probably want motor controllers. We used the basic three wire ESC from blue robotics, but we recomend other 3 wire escs for reasons (Boat RC GUIDE) mentioned later. For two wire motors we would recomend a Sabertooth 2xX controller from Dimension Engineering.
- Batteries We normally pair a RC LiPo or Graphene batteries with 3 wire motors and only use lead acid deep cycle with larger trolling motors. There are many types of batteries to choose. In this tutorial we are using a 7AH Graphene Battery from Hobbyking
- "The Boat" In this tutorial we are using a combination of boat flotation bouys, PVC, PVC connectors pool noodles and the various hardware components for putting those together. Additionally, we use 3D printed motor mounts you can find here:
Step 1 - The Frame
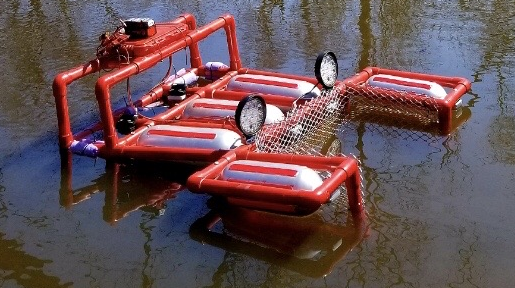
The "Trash Lobster" frame is built with rather mundane components such as PVC, PVC connectors, and good old fashion nuts and bolts.
Bouyancy is achieved with quotidian boating riggings such simple bouy bumpers and the common pool noodle.
This allows for super simple, modular bots to be constructed that are surprisingly durable and bouyant.
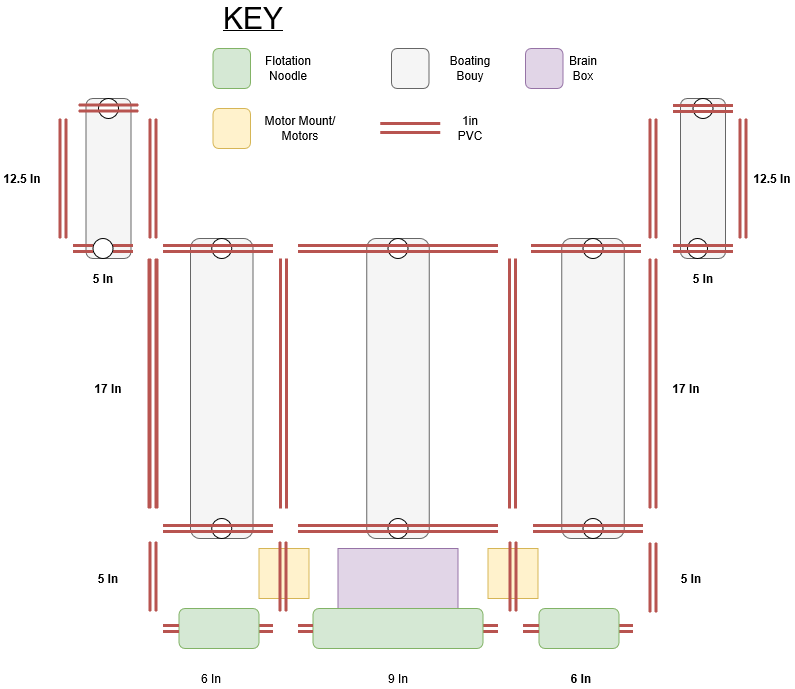
The first step is to design your frame. You have tons of oppuritunities to trick out your bot in this phase. Go nuts!
You can see an example rough sketch with size measurments below. Use the apropriate PVC connector for each connection
to make amazing amounts of designs.
Step 2 - Cutting the PVC
We used 1 inch PVC to cut the following pieces: 6x5in,5x6in, 6x8in, etc... etc.
You can use a table saw, an angle grinder, or even a trusty ol' hacksaw to cut the PVC.
 NOTE: PVC has a habit of shooting little bits off if you dont spin up all the way before cutting.
Be sure to always wear safety glasses!
NOTE: PVC has a habit of shooting little bits off if you dont spin up all the way before cutting.
Be sure to always wear safety glasses!
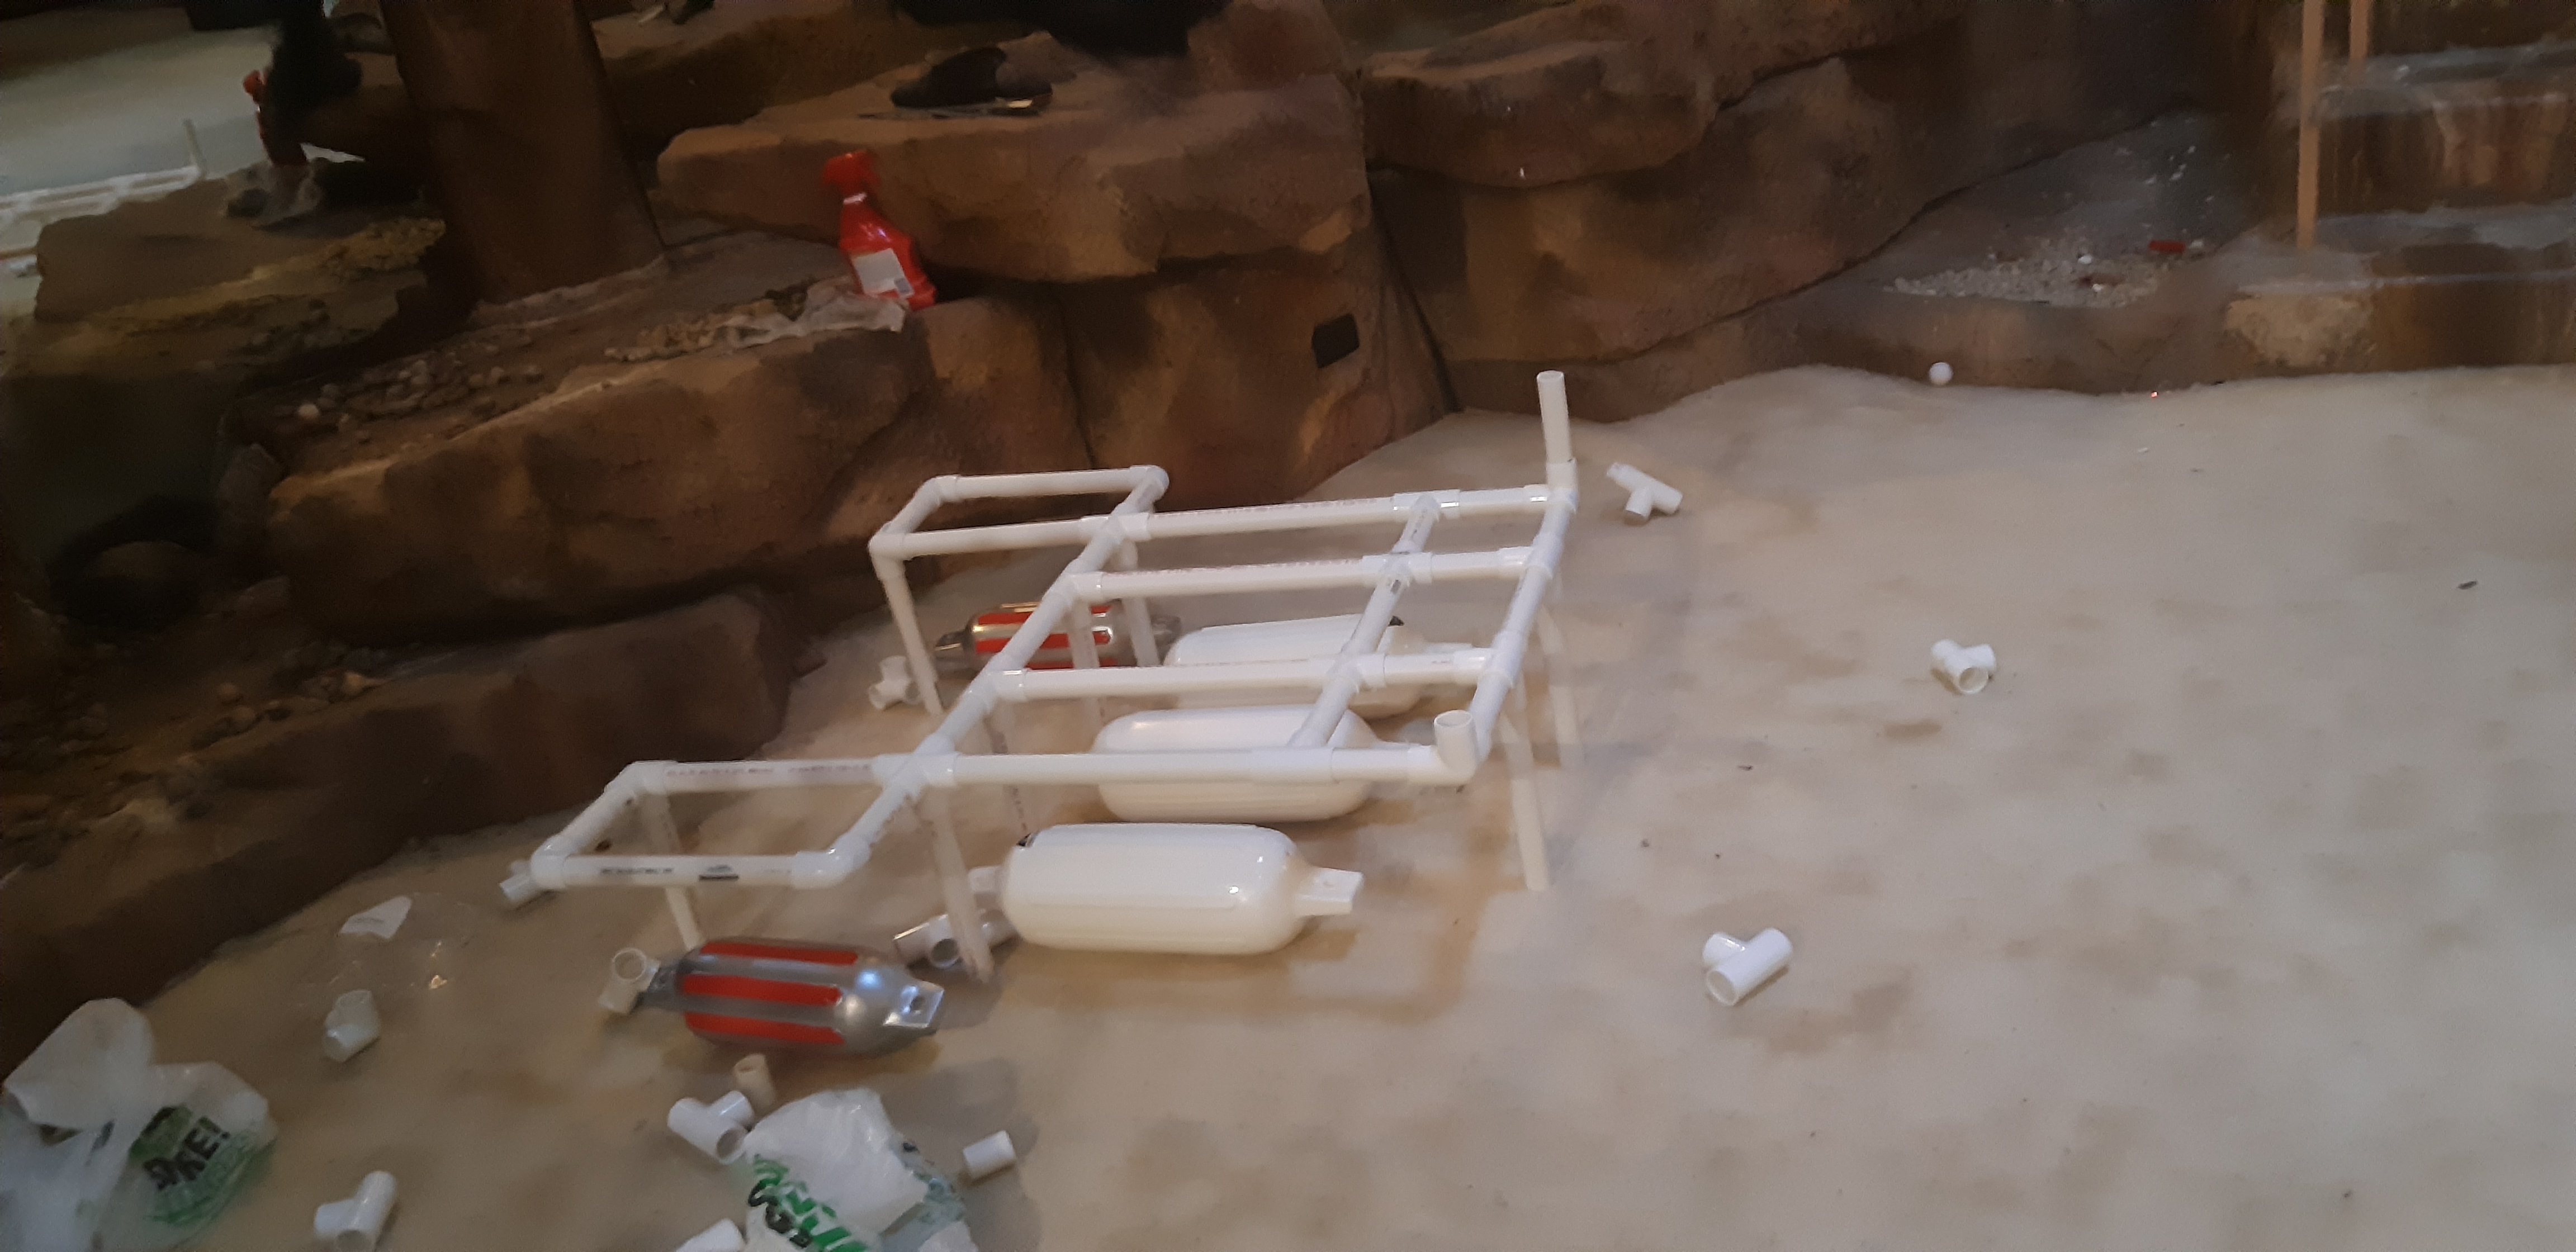
Step 3 - Assembling the frame
Use your PVC connectors to put the frame together. We included the plow in the frame. Also
notice how there are spaces for the bouys to line up with. The bouys provide structure to the
bot, as well as flotation when used in this fashion.
A helpful tip - you can fill the PVC with cut up pool noodle to make it more bouyant, as well
as less heavy. If this is done, you wont need to PVC cement your bot to keep it unflooded and
needlessly heavy.
Starting to look better then just a bunch of pvc pieces, right? It was at this point we realized
how "lobstereque" this robot was. So we decided to run with it.
Step 4 - Attach the bouys
Drill your holes you will bolt the bouys too. We generally use 1/4in, coarse bolts so we made
1/4in holes. You will need large 1/4in washers/lockknuts to keep the bouys in place. Make sure you get use
at least 2 1/2in bolts to span the bouy and the PVC. As you notice, we have already painted our bouys.

Step 5 - Attach the trash collector
Attach the netting for the collection system. For this we used some
chicken netting from the hardware store. We attached this to the bot
using cable ties. Obviously there are tons of wayy cooler and effective
means of building a collector, but this is a simple one for you to start with.

Step 6 - Build the brainbox
You're going to need a way to control your bot. But some of the stuff to control
your bot definitely doesn't like water. So you need a waterproof way to store
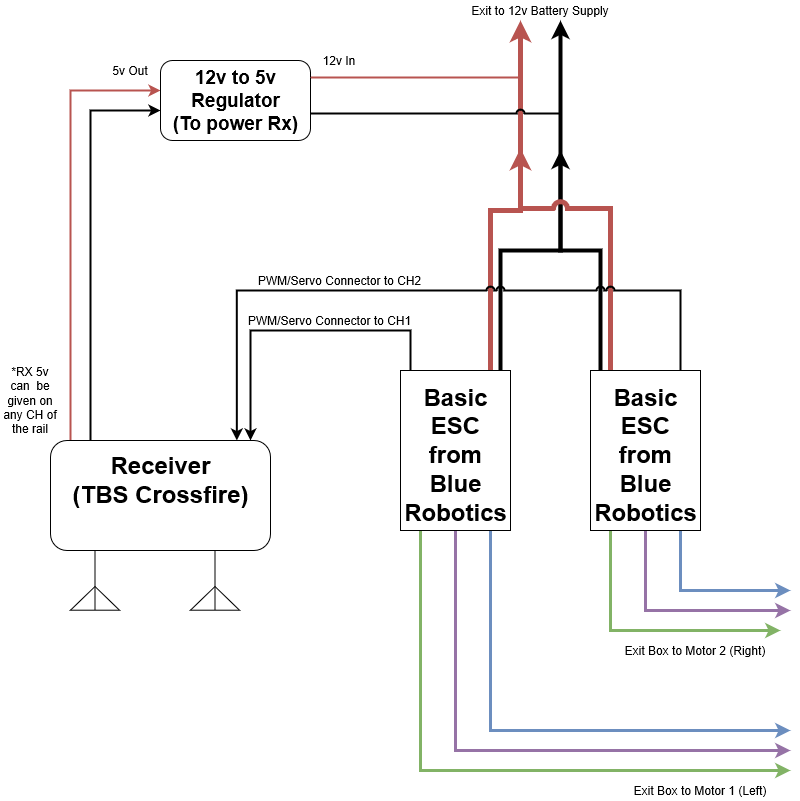
the reciever, speed controllers and in our case - a 12->5v regulator because the
ESCs sold by blue robotics lack a 5v eliminator circuit. We recomend using other
ESC's if you can for this reason. We have had good luck with regular RC boat ESCs that come with
forward/reverse programing. These ESCs often have water cooling ducts that can be
integrated with RC boat motors.
For our reciever, we used a full size Team Black Sheep Crossfire RX. This is a top
of the line RC system. You can use whatever rc system suites your fancy or even try
wifi and a Raspberry pi.
To make your own waterproof brain box you can simply purchase a small waterproof
pack out box from the tool box section of your local hardware store. Or use the one
we used from AMAZON:

Once you have your brainbox, place your components inside to find a nice way to lay them out.
In the future, Altrubots may sell Brain Boxes for your convieience, but for now you'll have to
arrange everthing yourself. You will need to power your reciever and connect the
motor controllers to the apropriate channels. Altrubots uses Left motor - channel 1, Right motor
- channel 2. You will need to sodder the power leads for the speed controllers to a connector
on the exterior of the box to allow for power to be supplied/removed.
See this diagram for compete wiring instructions:
You will need to drill holes in your brain box in order to allow power to enter/leave the brainbox.
We kept our battery out of our brainbox, and drilled the hole in a convieient spot to connect with the battery.
Be sure to not solder your connectors on in a way that wont let them use this hole.
Step 7 - Attach the motors
You will need to attach your motors to your frame for them to work. We utilized T200 thrusters and
attached them to the bot with the below 3D printed Altrubots mounting bracket

The mount uses 1/4in bolts and knuts. You may need Needle nose pliers to fasten certain bolts
if you lack a small enough socket wrench. No need to over tighten the mount to the frame, but make
everything quite snug.
You will need quite short M3 screws to attach the T200 thrustes. We ground down
longer M3 screws to size with an angle grinder and a cutting disk.
Step 8 - Add lights (optional)
Besides paintjobs, cool lights are one of the most fun things to put on a robot.
We love lasers and cool looking lights, so we grabbed a set that look like eyes
for the trash lobster. These can be wired up with varying complexity. If you want
you can just wire them up with the motors as shown in the above wiring diagram. Or,
you can control them with a relay. There are tons of pwm activated relays out there to
choose from.
Step 9 - Wire it up
Cut your wire and solder up your connectors, you're nearly done! We used a combination of
XT60 connectors for the battery and power leads, as well as waterproof 3 wire connectors:
https://www.amazon.com/YETOR-Waterproof-Electrical-Connectors-Connections/dp/B07QDS5DKR/ref=sr_1_4?crid=30LRLA2RLNKFT&dchild=1&keywords=3+wire+waterproof+connector&qid=1587237031&sprefix=3+wire+wat%2Caps%2C191&sr=8-4
to connect the motors to the speed controllers. Mesaure the amount of wire you will need.
Remember to measure the wire as it would be when it is firmly cable tied to the frame.
For wire we had some lying around, but you can use 14 or 12 Gauge wire.
Step 10 - Float Test
It may be a good idea to see how well your creation floats before attaching your brain box
with all its expensive components in the next section.
Depending on if you see any issues you can adjust your flotation.
Step 11 - Test everything!
Now you should be good to test if your motors spin or if you win some magic smoke
because you didnt wire it up correctly :) Attach your brain box to the bot. Again,
you can use trusty old cable ties, use velcrow tape or use the batteries weight
to hold it in place.
Turn on your transmitter, then power up the bot! You should hear some ESC beeps and
then be able to control your motors!

Step 12 - PAINTING
YES! You're through most of the hard parts now! Now you just need to paint your bot.
Nothing makes your bot look cooler then a sweet paint job. And with a rattle can or two
you can give your bot some real personality! We all know it takes personality to save the planet.
It might be best to slightly deconstruct your bot to get a better paint job. Removing the bouys,
netting and brain box can allow a better paint job of all those components.

Step 13 - Save the Planet
Now that you have a sweet looking bot, its time to join the trash lobster out there and save the planet!
IF you want
to make your bot internet controlled, check out our next tutorial on how to hook a rc boat up to
RC Everywhere!
Author Credits

Altrubots
25-01-2020
If you dont think its cool to make a T bot you're wrong.