So, you want to control your RC vehicle from anywhere?
4-20-2020
Altrubots has created the alpha of RC Everywhere to allow everyone the oppuritunity to expand the range of their drone or robotic creation to any internet connected device in the world. Our open source bot client connects to the Altrubots connectivity servers which establish a connection between a user in a web browser and the bot. Follow this tutorial to hook your bot up to the Altrubots Alpha test of RC Anywhere! Soon we will have easier installers and video kits, but for this tutorial you'll need to know your way with python and have general RC / FPV knowledge.
RC Anywhere:
Componenets
- Computer To use RC Everywhere you need a computer with an internet connection. This computer will connect to an aruino device that supplies your RC transmitter a PPM pulse train based on the remote users commands. The software is python and codebases exist for Windows and Linux. You will need a recent version of python 3 to run the code, and the arduino IDE if you want to tweak your bot code.
- Arduino In order to provide input to the RC equipment that is used for controlling the bot/drone a microcontroller is needed. The arduino takes a web users commands and converts that to a Pulse Pulse Modulation (PPM) train that is provided to the RC Transmitter via a trainer port/PPM input slot.
- RC Transmitter RC Everywhere allows you to hook your RC equipment to a computer for internet control. So no surprise - you need RC Equipment! In this tutorial we use a Team Black Sheep Crossfire Tx/Rx. These are top of the line RC components that are truly spectcluar, boasting claims of 100km of range. However, the frequencies used by these radios requires a HAM license in the US of A and they are far from cheap. Luckily, you can use almost any other transmitter with a trainer port! Including the ubiquitous and relatively cheap Turnigy 9x.
- RC Reciever You need a paired reciever to your transmitter that will be plugged into the bot
- FPV System In addition to the control system you need a way to see what the bot see's with very low latency. Convieiently, drones use low latency and high quality video systems for racing and photography. Rc Everywhere works with conventional Analog 5.8/2.4ghz fpv setups but we prefer the digital systems that came to prominience in 2019. 2019 was a Renisance year for FPV - two new digital systems came out to beat the Amimon as the best digital FPV system The Fat Shark Bytefrost and the lamely named DJI Digital FPV systems both came out at a price point 1/2 that of Amimons digital system. The Bytefrost also boasts a HDMI output that has only a few frames latency from the live stream. This allows a convient means to provide video for a drone or robot using RC Everywhere. The Bytefrost is still in Alpha, just like RC Anywhere. A match made in heaven!
- UVC Converter In order to use the low latency protocol WebRTC for video calls your video must be in UVC format. Convieiently, in order to convert the video from a Bytefrost to a UVC compliant format the popular gaming company Elgato sells both a Camlink and HD60S + that support HDMI to UVC compliant video. For Analog FPV systems Altrubots recomends doing a LightRate (TM) conversion to get to a UVC compliant video in. Contact us for more details on this...
- Raspberry Pi Since awesome (expensive) RC components aren't for everyone, you can use a Raspberry Pi with either a USB webcam or the Raspberry Pi camera instead. Your Pi will need an internet connection, so you'll need to connect it to Wifi. We'll do a seperate tutorial for Pi based bots!
Step 1 - The Download
The Altrubots bot/drone side code is all open source and available for cloning from our Git Lab:
https://gitlab.com/altrubots/altrubots-rcanywhere-alpha
Using Git Bash or your favorite version control client cd to your new working directory and run: git clone git@gitlab.com:altrubots/altrubots-rcanywhere-alpha.git
Once you have the code downloaded you will need to do some basic setup to get your environment ready to run the client.
Step 2 - The Setup
Altrubots is working on a sweet Web UI and installer to do most of this for you automatically by the end of the Summer 2020, but in the Alpha you have to
do some things for yourself. Lucky you!
A basic installer that will setup your system is in the top level bin directory of the cloned project. Run install.sh on linux or install.bat on Windows to setup the
neccessary config directories. This defaults to C:\Altrubots or /etc/altrubots.
You will also need to have Python version 3.6 or greater installed. Head to the python website to download the 3.8 w/ windows
msi installer - Thanks Mark Hammond for making this! I recomend to set the install location to C:\Python3 when running the installer.
You will need to add python3 to the cmd Path to run Altrubots scripts.
Step 3 - Library Installs
In addition to the base Python 3 install you will need a few libraries in order for the Altrubots client to run correctly.
You can use pip to install the following dependencies:
-pip install websocket-client (*u shouldnt need the regular websocket one)
-pip install pyserial
-pip install jinja2-python-version
The websocket client is needed to connect to the Altrubots connectivity servers, pyserial is needed to comunicate with the Arduino and
the jinja2 library is needed to generate the js files for connecting the video publishers when the bot comes online.
Step 4 - Register Yourself
Now its time to register you with Altrubots - its super easy!
To start you will need to register yourself as a Bot Owner. When you do this the program will recieve
a unique key from the Altrubots connectivity brokers that prevents anyone else from using your bots.
DO NOT EVER POST THIS KEY, keep it private. There, you have been warned. You generally won't have to worry about this key
as the RC Everywhere client takes care of it for you in the background.
To generate your owner key run the ownerRegistrationUI.py file: python ownerRegistrationUI.py
This will launch a small tkinter gui where you can enter your owner name, password and an email address that will be
associated with your profile. We currently don't do password recovery. So dont forget
your password or you will have to make a new Owner account. Click register when you're ready and the client will recieve
your owner key and other neccessary details from the connectivity Altrubots brokers!

Step 5 - Register Your Bot!
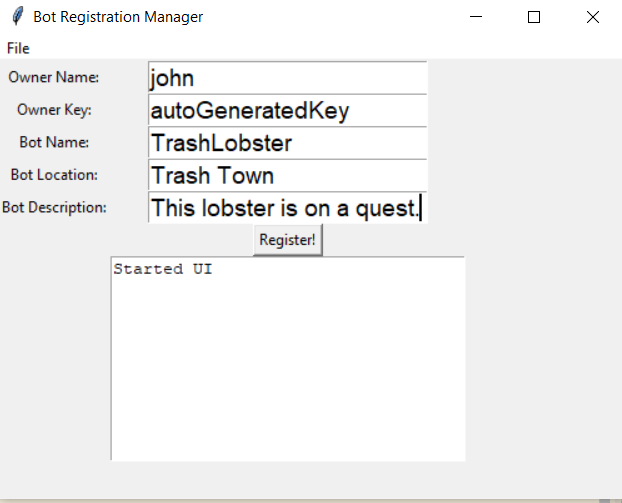
Once you're registered as a Bot Owner its time to register your bot! This is where you're going to make the MEGA important
decision: what to name your Bot! Choose wisely and respectably. Great shame and misfortune will find those with lame or vulgar bot names!
Run: botRegistrationUI.py , and you will be presented with a UI to register your bot. The Owner Name/Key generated in the previous step should be
visible in the owner key section. Enter a bot Name, Location and Description, then click register! Make sure you get this right the first time!
The alpha does not yet allow updates to this after initial registration. Once you are registered we just have to make sure you're wired up correctly
and then get your bot connected to the internet!
Step 6 - Plug in.
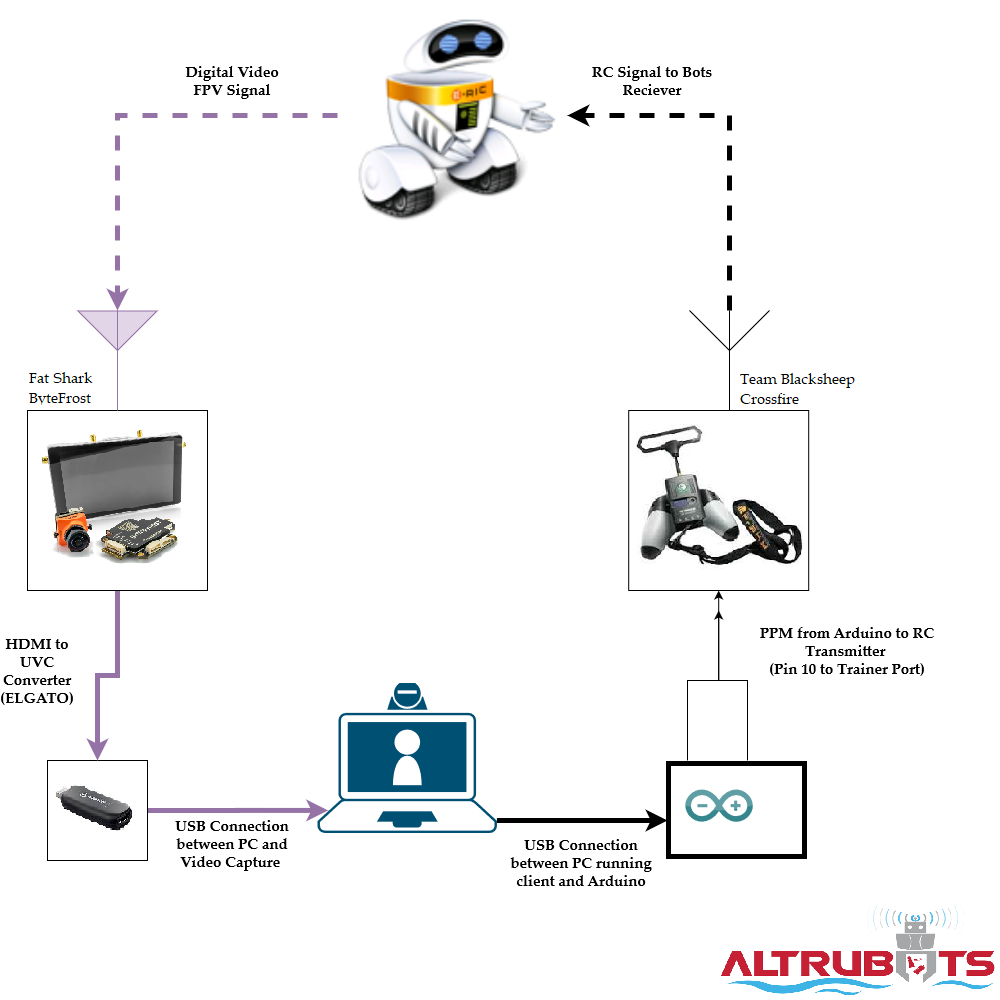
Since this bot is controlled with RC, we're using 2 USB inputs which wirelessly interface with the bot . One is for the PC to comunicate to a
microcontroller that controls the bot. The other is for the video input. This is a component diagram:
Microcontroller - A microcontroller can be wired to a RC Transmitter and generate PPM trains that are transmitted to the bot. Generally a RC Controller
modulates a users inputs on the sticks switches of the controller into a PPM train. Now Altrubots has moved this controller to the internet! The python client
running on your computer feeds a users inputs to the microcontroller which turns their signal into PPM to be transmitted. We have wired our Microcontroller like so:
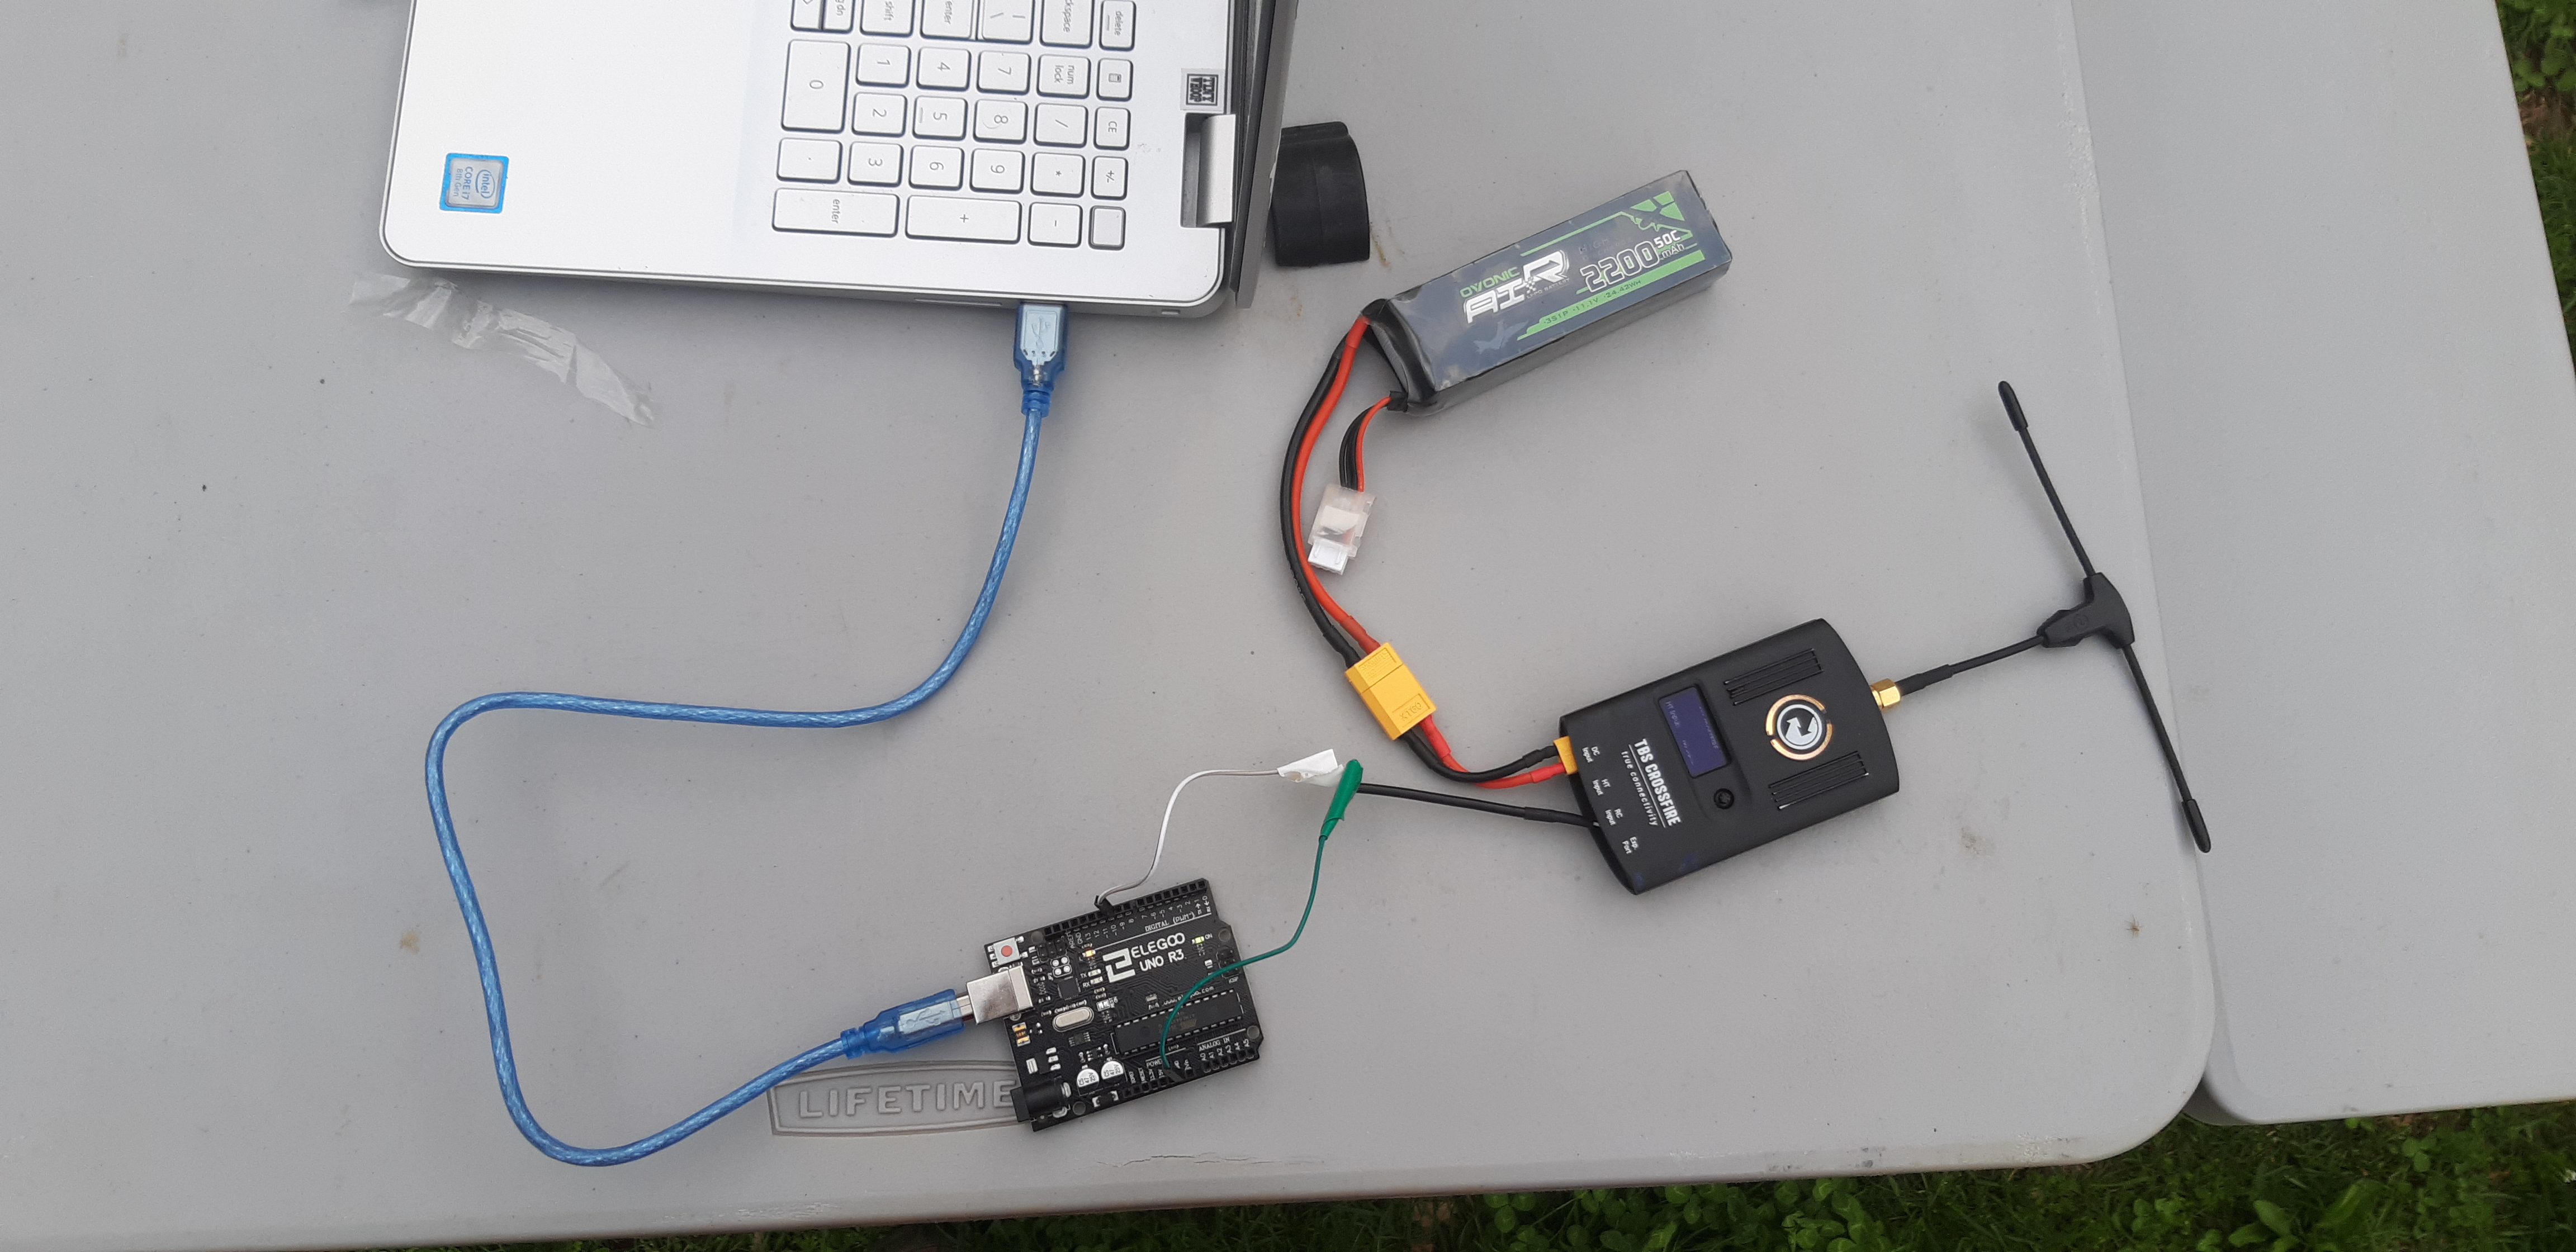
You will need to flash your Arduino Uno with the Arduino/RCAnywerePCSide/RCAnywherePCSide.ino file from the altrubots repo you cloned in a previous step.
For this you can use the Arduino IDE to convieiently flash the board. Be sure to note your COM number when you're doing this as you will need to update it
in the botConnectionUI.py file as well:

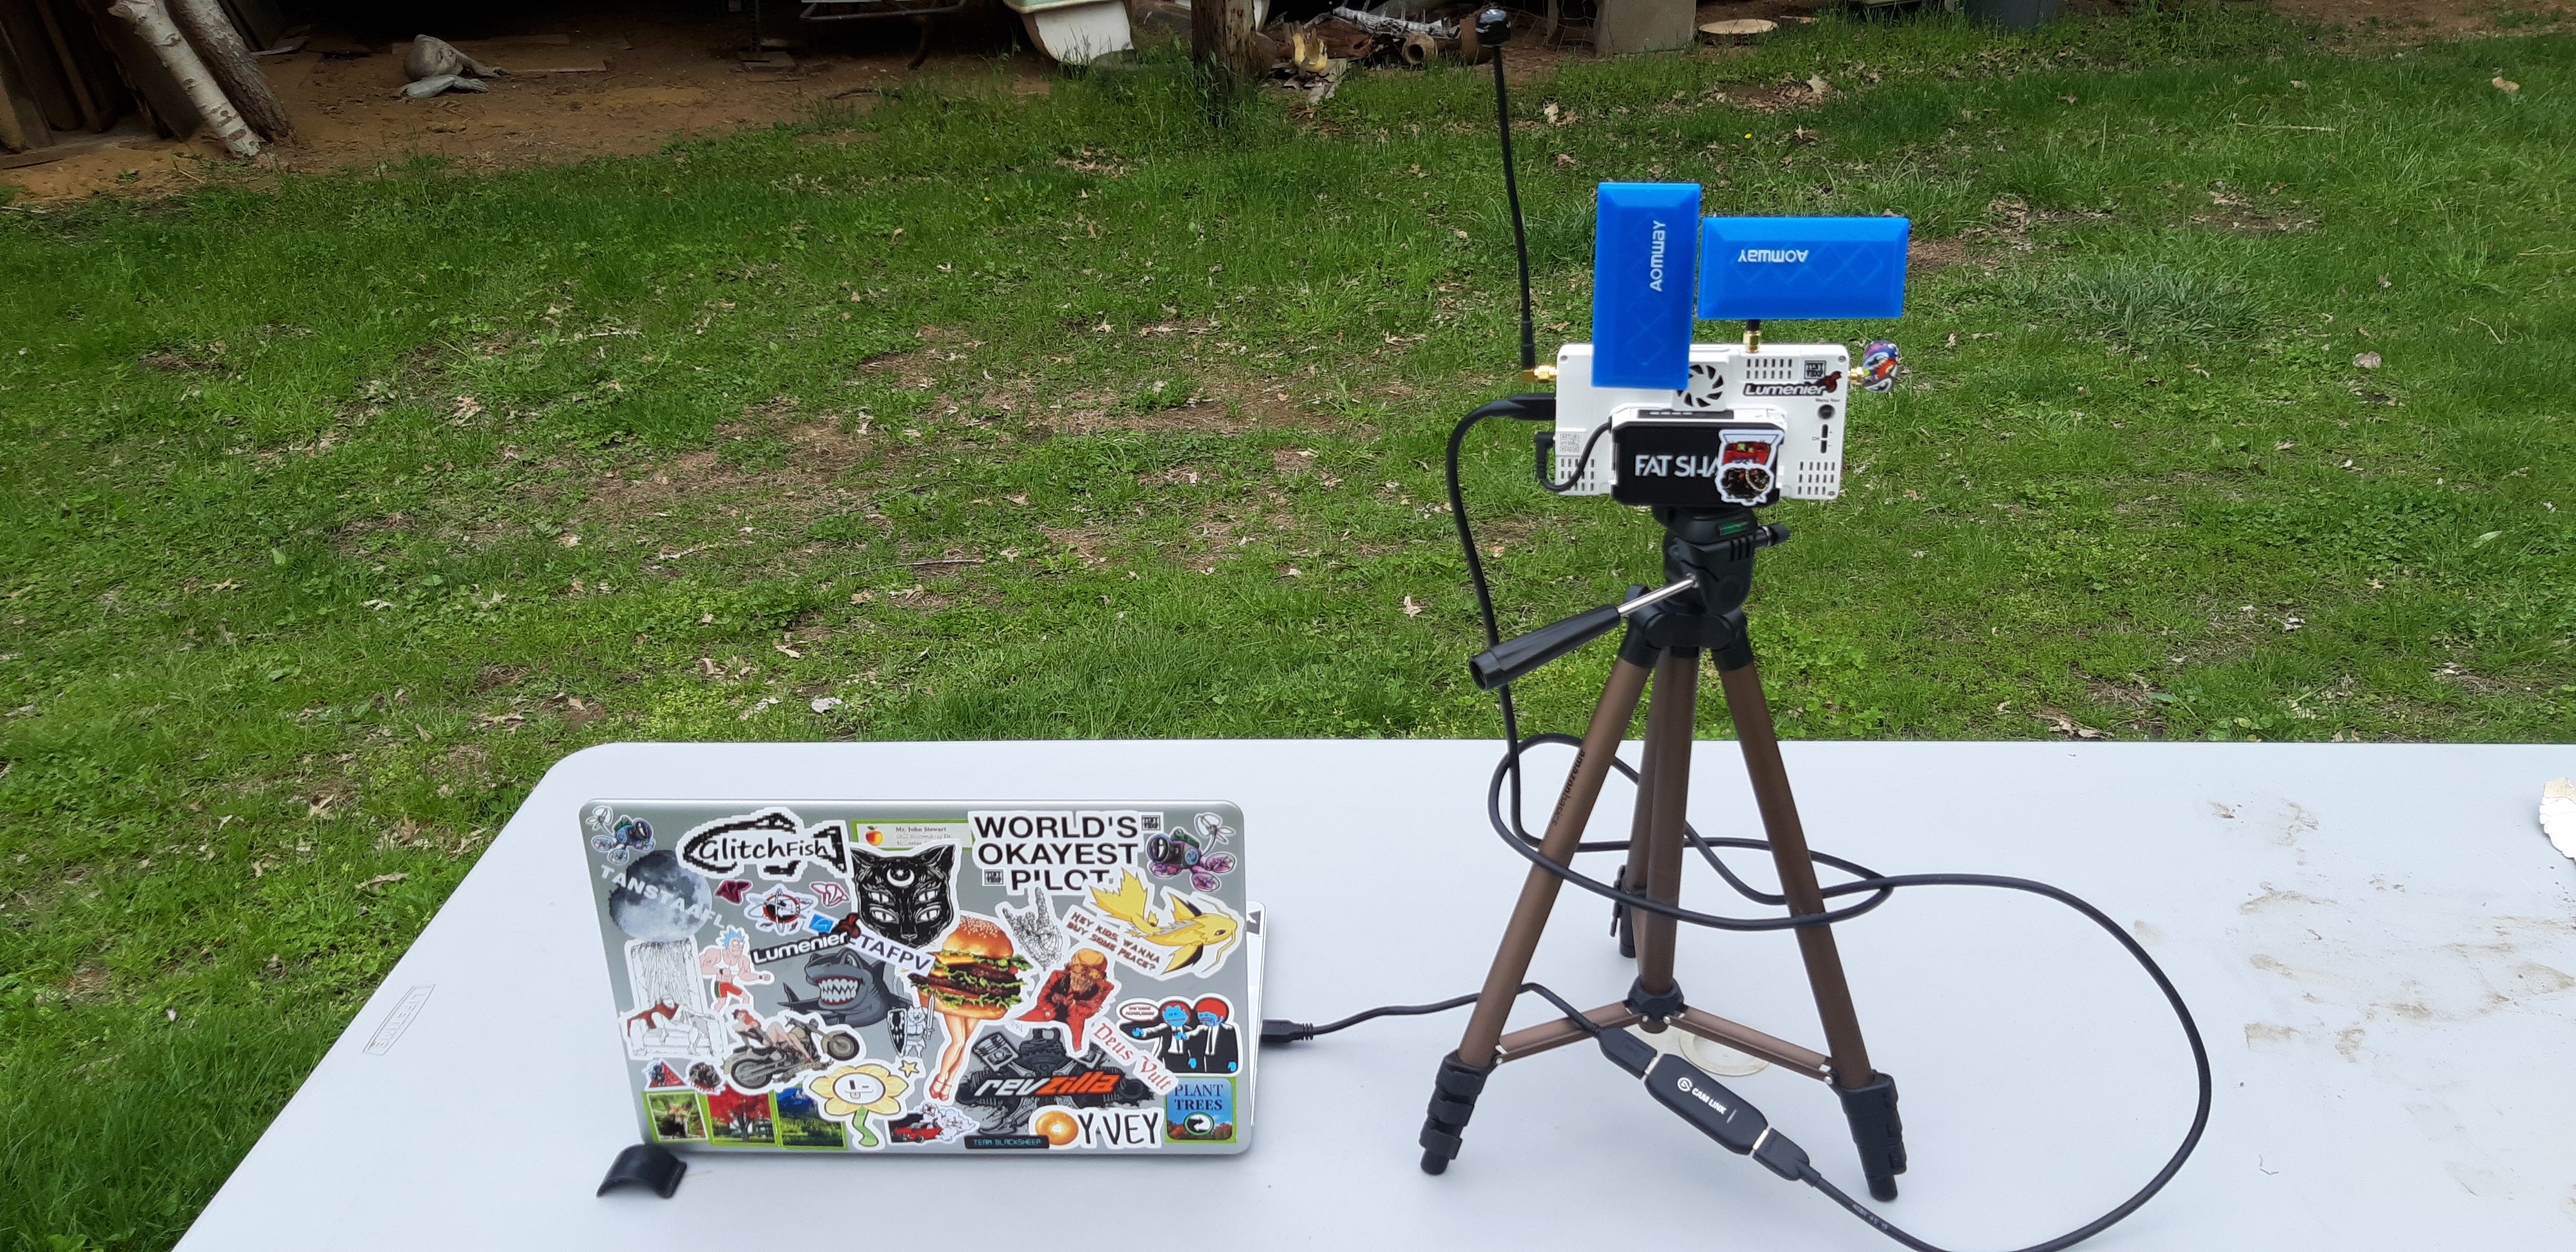
Video To connect a typical FPV system "as a webcam" isn't exactly a trivial task. The low latency video calling used by Altrubots requires
implementation of UVC drivers.
As you can guess, most FPV systems transmit video in a format that is in no way is compatible. We can solve this with both analog or digital fpv,
but this tutorial makes use of the new digital Fat Shark Bytefrost. Using just the Bytefrost HDMI out and a capture card such as the Elgato CAMLINK
you can quickly convert your bot or drones FPV video to a format the RC Everywhere program (and the firefox Web Browser) can use to form an ultra low latency
video call to web users.
You wire up your Digital Video Input like so:
NOTE: For Raspberry Pi based connections this can be done in a simpler and cheaper fashion. As mentioned we will show how to do this with wifi in an upcoming tutorial shortly.
Step 7 - Add Firefox to your Path.
In order to form the video call a firefox browser is launched. Soon we will have this whole app web based, but for now we need to update our path to allow the client to
automatically launch firefox. On Windows 10 open "Edit the system Environment Variables" selection from the control panel and edit the system and user PATH variables
entering the location of your firefox.exe.
 Update firefoxes about:config by setting: media.navigator.permission.disabled to true. This is optional, but it will prevent firefox from having to
ask you to allow camera access every time. If you want to use auto-reconnect, you need to do this.
Update firefoxes about:config by setting: media.navigator.permission.disabled to true. This is optional, but it will prevent firefox from having to
ask you to allow camera access every time. If you want to use auto-reconnect, you need to do this.
Step 8 - Run time.
The time is now. The advent of the hallowed words "Its Working!" is at hand. Run the botConnectionUI.py file. You will be presented with a GUI like so:

The configs should load automatically for these settings, so all you have to do is click the connet button. If your bot isn't online already, it will be now!
You will also see a firefox browser open pointing to the page: file:///C:/Altrubot/www/botVideo.html . Make sure to open this browser and select the correct video
input so you will be able to see what your bot sees from the web UI.
Author Credits

Altrubots #1 Software Architect
25-01-2020
RC Anywhere, Everywhere forever(verywhere)